
티스토리 뷰
0.
내용은 안드로이드 스튜디오 IDE를 기본적으로 다룰줄 아는 것을 전제로 작성되었습니다.
본 글에 대한 질문은 적극적으로 받고 있습니다. 이메일을 통해 질문해주시면 더 빠른 답변을 받으실 수 있습니다.
질문시에는 반드시 질문내용과 관련된 부분의 소스코드를 첨부해주시기 바랍니다.
1. 안드로이드와 FCM연결하기
FCM을 활용하기 위해 필요한 것
1. 푸시알림을 눌렀을 때 이동할 액티비티(1개이상)
2. FCM 푸시 알림을 받기 위한 서비스를 구현할 클래스
3. 메니페스트.xml 수정
이전에는 gradle의 dependency를 수정하는 작업도 해줘야 했지만 최신 안드로이드 스튜디오에서 FCM을 연결하는 과정을 아주 간단하게 제공하면서 더 수월해졌습니다.
안드로이드 스튜디오에서 [Tools]->[Firebase]->[Cloud Messaging]->[Set to Firebase Cloud Messaging]을 선택합니다.

그 뒤 가이드에서 나오는 순서대로 천천히 해주도록합시다.
1. Connect to Firebase를 선택하면 Firebase 콘솔창이 열립니다. 여기서 구글 계정이 로그인이 되어있지 않으시다면 구글 계정 로그인을 요구할겁니다. 만약 구글 계정이 없다면 반드시 계정을 생성하고 다시 시도해야합니다.

허용을 누르면 스튜디오에서 다음과 같이 새 프로젝트를 만들것인지 기존 프로젝트를 선택할 것인지 물어봅니다.
저는 기존에 진행중인 하나의 프로젝트가 뜨네요. 하지만 이글을 읽는 모든분들이 처음 시도할거라 생각하고 저도 하나 새로 만들어보겠습니다. 이름을 자유롭게 작성한뒤 Connect to Firebase를 선택합니다.
연결을 위해 약간의 시간이 소요됩니다. 완료될 때까지 기다립니다.
완료가 되면 우측에 Firebase가이드에서 1번 부분이 체크될것입니다. 이제 2번을 진행해줍니다.
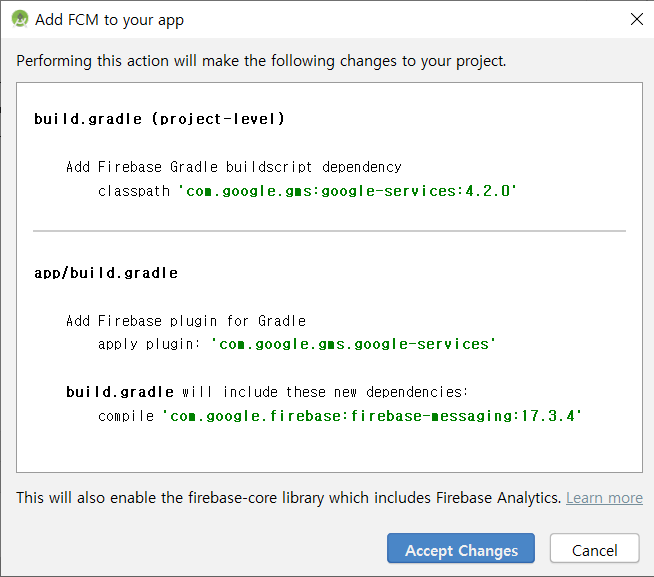
이제 앱에 FCM사용을 위한 작업을 합니다. 이전에는 앱의 gradle과 프로젝트의 gradle파일 2개를 다음과 같이 수정해야했습니다. 이제 그럴 필요없이 버튼한번으로 간편하게 추가할 수 있습니다.
이작업이 완료되면 마찬가지로 2번부분이 체크표시가 생길것입니다.
2. 프로젝트 준비하기
이제 코드로 구현하여 푸시알림을 받아보겠습니다.
먼저 푸시알림을 눌렀을 때 실행할 Mainactivity를 작성합니다.
package c.guitar.fcmexample;

import androidx.appcompat.app.AppCompatActivity;

import android.content.Intent;
import android.os.Bundle;
import android.util.Log;

public class MainActivity extends AppCompatActivity {

    @Override
    protected void onCreate(Bundle savedInstanceState) {
        super.onCreate(savedInstanceState);
        setContentView(R.layout.activity_main);

        Intent intent = getIntent();
        if(intent != null) {//푸시알림을 선택해서 실행한것이 아닌경우 예외처리
            String notificationData = intent.getStringExtra("test");
            if(notificationData != null)
                Log.d("FCM_TEST", notificationData);
        }
    }
}
푸시알림을 선택하였을 때 온 인텐트를 가져오고 해당 푸시알림에 담긴 커스텀데이터를 가져와 출력해보겠습니다.
그다음 푸시알림 서비스 클래스를 생성합니다. 이전에 firebase가이드를 다시 한번 보겠습니다.

설명을 읽어보면 FirebaseMessagingService를 상속받으라고 되있습니다.
해당 클래스를 상속받는 클래스를 생성하고 onNewToken과 onMessageReceived메소드를 오버라이드합니다.
그리고 메소드를 다음과 같이 작성합니다.
package c.guitar.fcmexample;

import android.app.Notification;
import android.app.NotificationChannel;
import android.app.NotificationManager;
import android.app.PendingIntent;
import android.content.Context;
import android.content.Intent;
import android.os.Build;
import android.util.Log;

import com.google.firebase.messaging.FirebaseMessagingService;
import com.google.firebase.messaging.RemoteMessage;

import androidx.core.app.NotificationCompat;

public class YourClassName extends FirebaseMessagingService {
    @Override
    public void onNewToken(String s) {
        super.onNewToken(s);
        Log.d("FCM_TEST", s);
    }

    @Override
    public void onMessageReceived(RemoteMessage remoteMessage) {
        super.onMessageReceived(remoteMessage);

        String title = remoteMessage.getData().get("title");//firebase에서 보낸 메세지의 title
        String message = remoteMessage.getData().get("message");//firebase에서 보낸 메세지의 내용
        String test = remoteMessage.getData().get("test");

        Intent intent = new Intent(this, MainActivity.class);
        intent.putExtra("test", test);

        PendingIntent pendingIntent = PendingIntent.getActivity(this, 0, intent, PendingIntent.FLAG_UPDATE_CURRENT);

        if (Build.VERSION.SDK_INT >= Build.VERSION_CODES.O) {

            String channel = "채널";
            String channel_nm = "채널명";

            NotificationManager notichannel = (android.app.NotificationManager) getSystemService(Context.NOTIFICATION_SERVICE);
            NotificationChannel channelMessage = new NotificationChannel(channel, channel_nm,
                    android.app.NotificationManager.IMPORTANCE_DEFAULT);
            channelMessage.setDescription("채널에 대한 설명.");
            channelMessage.enableLights(true);
            channelMessage.enableVibration(true);
            channelMessage.setShowBadge(false);
            channelMessage.setVibrationPattern(new long[]{1000, 1000});
            notichannel.createNotificationChannel(channelMessage);

            //푸시알림을 Builder를 이용하여 만듭니다.
            NotificationCompat.Builder notificationBuilder =
                    new NotificationCompat.Builder(this, channel)
                            .setSmallIcon(R.drawable.ic_launcher_background)
                            .setContentTitle(title)//푸시알림의 제목
                            .setContentText(message)//푸시알림의 내용
                            .setChannelId(channel)
                            .setAutoCancel(true)//선택시 자동으로 삭제되도록 설정.
                            .setContentIntent(pendingIntent)//알림을 눌렀을때 실행할 인텐트 설정.
                            .setDefaults(Notification.DEFAULT_SOUND | Notification.DEFAULT_VIBRATE);

            NotificationManager notificationManager =
                    (NotificationManager) getSystemService(Context.NOTIFICATION_SERVICE);

            notificationManager.notify(9999, notificationBuilder.build());

        } else {
            NotificationCompat.Builder notificationBuilder =
                    new NotificationCompat.Builder(this, "")
                            .setSmallIcon(R.drawable.ic_launcher_background)
                            .setContentTitle(title)
                            .setContentText(message)
                            .setAutoCancel(true)
                            .setContentIntent(pendingIntent)
                            .setDefaults(Notification.DEFAULT_SOUND | Notification.DEFAULT_VIBRATE);

            NotificationManager notificationManager =
                    (NotificationManager) getSystemService(Context.NOTIFICATION_SERVICE);

            notificationManager.notify(9999, notificationBuilder.build());

        }
    }
}
메니페스트 파일에 다음 코드를 추가하여 수정해줍니다.
        <service
            android:name=".YourClassName"
            android:stopWithTask="false">
            <intent-filter>
                <action android:name="com.google.firebase.MESSAGING_EVENT" />
                <action android:name="com.google.firebase.INSTANCE_ID_EVENT"/>
            </intent-filter>
        </service>
3. 기본알림 메세지 받기
이제 준비를 마쳤으니 기본메세지를 보내보겠습니다.
firebase메세지를 보내기위해 포스트맨이라는 프로그램을 먼저 다운받겠습니다.
Postman | The Collaboration Platform for API Development
Simplify workflows and create better APIs – faster – with Postman, a collaboration platform for API development.
www.getpostman.com
홈페이지에서 프로그램을 다운받고 실행하면 계정을 생성하는 화면이 등장합니다. 계정이 만들고 로그인합니다.

가운데에 create a request를 선택합니다.
헤더탭에 다음과 같이 작성합니다.

Authorization에는 firebase에서 본인의 서버키를 입력합니다. 서버키는 firebase콘솔화면에서 프로젝트 설정-> 클라우드메시징에 가면 서버 키를 확인할 수 있습니다. 여기에 key=본인서버키 형식으로 값을 입력합니다
다음 바디를 다음과같이 작성합니다.

json 형식으로 키와 값을 입력합니다.
to에는 디바이스 토큰값을 입력합니다. 디바이스 토큰은 앱을 최초실행시 onNewToken함수에서 출력되어 로그캣에서 확인하여 복사한후 붙여넣으시면 됩니다. 이미 실행을 해서 디바이스 토큰을 확인 할 수 없다면 설치된 앱을 삭제후 다시 실행하시면 디바이스 토큰을 확인 할 수 있습니다.
실제 서비스 구현시 불특정 다수에게 푸시알림을 보내는것이 일반적이기 때문에 앱 로그인시마다 앱서버의 데이터베이스에 디바이스 토큰을 함께 사용자정보와 저장한뒤에 조건에 맞는 사용자에게 보내면 됩니다.
일일이 디바이스 토큰을 사용하지 않고 토픽을 사용하여 단체에게 보낼수도 있으므로 토픽을 활용한 FCM이용 방법도 다음에 시간이 있다면 포스팅해보겠습니다.
data에는 메세지에 담을 내용을 사용용도에 맞게 키와 값을 입력합니다.
기본적으로 title과 message를 입력합니다. 해당 키 이름 역시 제가 임의로 설정한 이름이며 여러분의 코드에서 임의로 작성한대로 바꾸어 입력하여도 무방합니다. 전 위 클래스에서 메소드에
String title = remoteMessage.getData().get("title");//firebase에서 보낸 메세지의 title
String message = remoteMessage.getData().get("message");//firebase에서 보낸 메세지의 내용
String test = remoteMessage.getData().get("test");
이와 같이 작성하였기 때문에 각 키의이름을 이와 동일하게 하였습니다.
그리고 위 url은 https://fcm.googleapis.com/fcm/send 로 보내고 보내는 형식은 GET이 아닌 POST로 변경합니다.
이제 SEND버튼을 누르면 해당 디바이스로 푸시알림이 발생합니다.

제작한 푸시알림이 정삭적으로 도착한 결과입니다. 해당 푸시알림을 선택할 경우 메인액티비티로 이동하고 test 데이터에 담긴 it is test가 로그캣에 출력됩니다.

'안드로이드' 카테고리의 다른 글
| 안드로이드 - 리스트뷰 항목에 버튼추가하기 (6) | 2020.02.01 |
|---|---|
| 안드로이드 - 구글맵 마커 기본 및 응용 (9) | 2020.02.01 |
| 안드로이드 - 구글맵 기본사용법 (0) | 2020.02.01 |
| 안드로이드 - 커스텀 액션바 만들기(toolbar) (5) | 2020.01.21 |
| 안드로이드 - 뷰 펼치고 닫기(ObjectAnim) (0) | 2020.01.21 |
- Total
- Today
- Yesterday
- 깃 허브 오류 해결
- UHT
- 깃 용량문제
- 빌드 주기
- c언어 기초
- refusing to run with root privileges
- 안드로이드
- 백준
- C++
- Connecting Jenkins
- 언리얼 빌드
- Unreal Header Tool
- 유니티 직소퍼즐 구현
- 안드로이드 구글맵
- 언리얼
- 알고리즘
- 구글맵
- 젠킨스 에이전트 연결
- 젠킨스
- 유니티
- C언어기초
- 알고리즘기초
- 언리얼 기초
- dfs
- c언어강의
- 언리얼 사용자 정의 구조체
- Jenkins
- Add Node
- Jenkins Build Periodically
- Connecting Jenkins Agent
| 일 | 월 | 화 | 수 | 목 | 금 | 토 |
|---|---|---|---|---|---|---|
| 1 | ||||||
| 2 | 3 | 4 | 5 | 6 | 7 | 8 |
| 9 | 10 | 11 | 12 | 13 | 14 | 15 |
| 16 | 17 | 18 | 19 | 20 | 21 | 22 |
| 23 | 24 | 25 | 26 | 27 | 28 |